Xamarin.Forms.Keyboard: The Master Guide
Using the keyboard is a bread-and-butter feature that all mobile developers should be familiar with. We all need to capture data from users sometimes and the keyboard reigns supreme.
Xamarin.Forms.Keyboard is a nice cross platform solution for capturing text on both Android and iOS. As a developer, you can specify a keyboard type once and it will work on all platforms.
The screenshots I have taken below are from the emulator running Android version 10 (API level 29). Unfortunately, I don't have a Mac to show you iOS screenshots however the principle should be roughly the same on all platforms.
I've been stuck at home for the past few months due to Covid-19 and building apps and writing guides has been a nice escape for me. Hopefully you'll find something in this guide useful!
Opening the Keyboard
There are two common approaches to open the keyboard when you need to capture some text from the user.
If you have an entry input box within your XAML then assign the keyboard within the XAML itself. Then when someone clicks on the entry box, the keyboard will open.
<Entry Placeholder="Enter text here">
    <Entry.Keyboard>
        <Keyboard x:FactoryMethod="Create">
            <x:Arguments>
                <KeyboardFlags>Suggestions,CapitalizeCharacter</KeyboardFlags>
            </x:Arguments>
        </Keyboard>
    </Entry.Keyboard>
</Entry>
You might also find yourself opening a prompt from your C# code via something like the DisplayPromptAsync method.
string result = await DisplayPromptAsync("Employee Id",
    "Enter Employee ID", "OK", "Cancel", null,
    8, keyboard: Keyboard.Default, "");
In both cases, a keyboard will be shown on screen for the user to enter input.
Windows 10
It's worth noting that if you're running a Xamarin.Forms app on Windows 10 via UWP then a keyboard won't actually show on screen unless it's running in tablet mode.
You can manually open the Virtual Keyboard built into windows however it's not designed to happen automatically. This needs to be a consideration if you need to deploy an unattended app on Windows 10.
Keyboard Types
I'm sure you've seen a mobile app where the keyboard that opens is different to the standard one, maybe it only shows numbers or another common layout. In Xamarin.Forms.Keyboard we can select a keyboard type.
Just replace Keyboard.Default with your desired keyboard type.
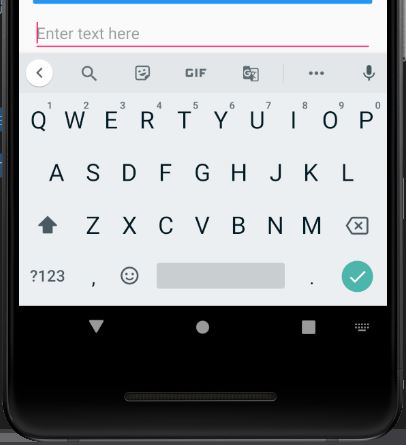
Plain Keyboard
The plain keyboard is terribly similar to standard default keyboard, at least on Android. It should be used when keyboard flags are not specified.
Unless you have specific requirements, you might use either the plain or default option as the standard keyboard used throughout most of your app's workflow,
Numeric Keyboard
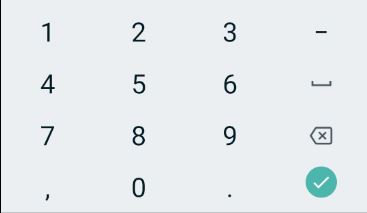
The numeric keyboard just shows numbers and a few symbols loosely associated with numerical inputs.
You might use this keyboard type if you are asking the user to enter their age or some other integer/double value. Remember that if someone plugs a usb keyboard into the device they might be able to bypass the limitation on which characters can be inputted to your text box, so remember to have validation behind the scenes.
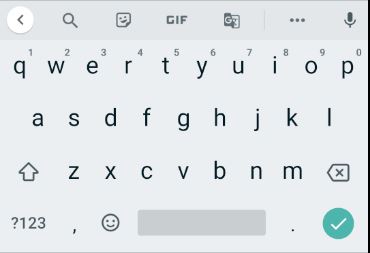
Chat Keyboard

The chat keyboard is again remarkably similar to the default keyboard however it should be used in places where emoji are used.
Try to use this instead of the default keyboard if you are looking to capture text for a chat window, because while the layout looks similar to the default now, this may change in the future.
Email Keyboard
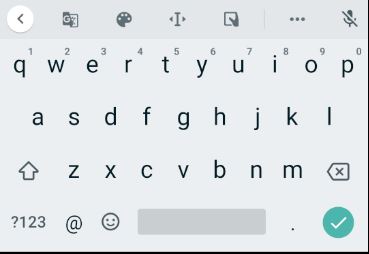
The email keyboard is similar to the default keyboard however you'll notice that the comma key has been replaced by the @ symbol.
Having this different layout helps users to quickly input their email address without having to click on the symbols button to find the @ key.
Telephone Keyboard
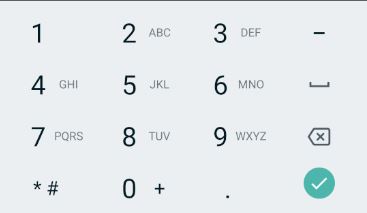
The telephone keyboard is similar to the numerical keyboard however the plus key is added underneath the zero key, and the hash key is behind the asterisk.
Again this is quicker for entering telephone numbers than the default keyboard and it's also more accessable to disabled users.
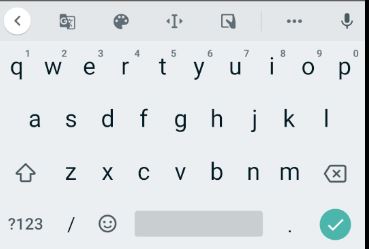
Text Keyboard

The next keyboard is basically the same as the default keyboard on Android.
Maybe use this when you're asking the user to input large amounts of text into a multiline text box.
Url Keyboard
The URL keyboard places the forward slash key on to the bottom row.
Keyboard Flags
The keyboard class has a create factory method that can be used to apply specific flags that customize the keyboard layout and functionality.
Flags are applied via enum value arguements when you create a new instance of the keyboard class.
string input = new Entry { Placeholder = "Type text here!" };
entry.Keyboard = Keyboard.Create(KeyboardFlags.Suggestions | KeyboardFlags.CapitalizeCharacter);

// in Display prompt
string result = await DisplayPromptAsync("Employee Id",
    "Enter Employee ID", "OK", "Cancel", null,
    8, keyboard: Keyboard.Create(KeyboardFlags.CapitalizeCharacter), "");
The keyboard flags are as follows:
- None – no features are added to the keyboard.
- All – indicates that spellcheck, word completions, and sentence capitalization will occur on text entered by the user.
- CapitalizeSentence – indicates that the first letter of the first word of each entered sentence will be automatically capitalized.
- Spellcheck – indicates that spellcheck will be performed on entered text.
- Suggestions – indicates that word completions will be offered on entered text.
- CapitalizeWord – indicates that the first letter of each word will be automatically capitalized.
- CapitalizeCharacter – indicates that every character will be automatically capitalized.
- CapitalizeNone – indicates that no automatic capitalization will occur.
Use these flags to help users navigate through inputting text quickly. You will find the users of your application will be more engaged if they spend less time worrying about inputting text correctly. By specifying flags, we take this burden away from our users.
Custom return (enter) key
The return key on the keyboard can be customized with a limited set of visual changes.
If your user is inputting values into a set of forms, then we may wish to configure the return key to focus the next text box. To make this clear to the user, we could alter the return key to show the placeholder text "Next".
You'll notice in the below screenshot that the standard tick return key has been replaced with a next button.
The code to achieve this in XAML
<Entry Placeholder="Enter text here" ReturnType="Next">
    <Entry.Keyboard>
        <Keyboard x:FactoryMethod="Create">
            <x:Arguments>
                <KeyboardFlags>Suggestions,CapitalizeCharacter</KeyboardFlags>
            </x:Arguments>
        </Keyboard>
    </Entry.Keyboard>
</Entry>
Also also in C#
var entry = new Entry { ReturnType = ReturnType.Send };
The other options to choose from are as follows:
Default – indicates that no specific return key is required and that the platform default will be used.
Done – indicates a "Done" return key.
Go – indicates a "Go" return key.
Next – indicates a "Next" return key.
Search – indicates a "Search" return key.
Send – indicates a "Send" return key.
Turn Spell Check on/off
Use the IsSpellCheckEnabled property to enable or disable spell check on your keyboard.
The spell checker is usually enabled by default and will auto-correct words that are not in the dictionary. It may not be required if you're capturing text that isn't in the dictionary.
Xaml
<Entry ... IsSpellCheckEnabled="false" />
C#
var entry = new Entry { ... IsSpellCheckEnabled = false };
Turn Text Prediction on/off
We can use the IsTextPredictionEnabled property to control the text prediction on the keyboard.
Genurally its best to leave this enabled however it's best to keep this disabled on fields where the user enters things like username's or words that are not in the dictionary.
XAML
<Entry ... IsTextPredictionEnabled="false" />
C#
var entry = new Entry { ... IsTextPredictionEnabled = false };
Trigger Action on Completion
You might want to trigger some kind of action once the user has clicked the return key on the keyboard.
You can react to this action and capture the input by specifying a method name within the Completed property.
// xaml file
<Entry Placeholder="Enter text here" Completed="Entry_Completed">
    <Entry.Keyboard>
        <Keyboard x:FactoryMethod="Create">
            <x:Arguments>
                <KeyboardFlags>Suggestions,CapitalizeCharacter</KeyboardFlags>
            </x:Arguments>
        </Keyboard>
    </Entry.Keyboard>
</Entry>


// .cs file
void Entry_Completed (object sender, EventArgs e)
{
    var text = ((Entry)sender).Text; //cast sender to access the properties of the Entry
}