Compile Sass Files in Visual Studio 2019 Using Web Compiler
Compiling Sass & LESS files in Visual Studio has never been easier. I'll show you how to use the Web Compiler extension to generate standard CSS files from multiple SCSS files on the fly.
What is SCSS?
Sass is a CSS preprocessor with enhancements to the CSS syntax. It's generally favoured over standard CSS for several reasons, I've found that being able to use imports and mixings' allows me to re-use code and maintain a larger codebase with more ease.
SCSS (Sassy CSS) is a newer standard, built as an enhancement to the older Sass standard.
What you can do after following this guide
Once you have followed the steps in this guide, your SCSS files will automatically be compiled to browser readable .css and minified min.css files every time you save the SCSS files.
Install The Extension
This tutorial assumes that you already have an ASP.NET Web Application open in Visual Studio.
We start by installing the Web Compiler extension to Visual Studio.
- Click on Extensions > Manage Extensions > Online
- Now search for "Web Compiler"
- Click on the Download button
- Close Visual Studio and wait for the installer to appear. Follow the steps to install the extension. NOTE that it can take a few seconds for the installer to appear. Wait for the installer to finish before re-opening Visual Studio.
Create Your SCSS file
We now need to create a SASS (scss) file. Start by creating a file named style.scss in the wwwroot > css folder

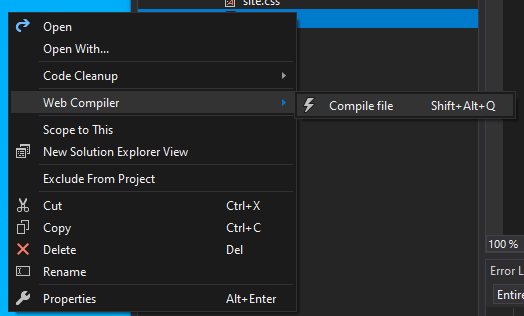
Now right click on the newly created style.scss file and click on Web Compiler > Compile file.
If everything worked as expected, you should now have a style.min.css file and a style.css file underneith the style.scss file. Contratulations, you've now compiled a Scss file into standard browser compatible css.
Understanding compiler.config
The very first time you use the Web Compiler extension, a file named compiler.config will be created in the root of the project. This JSON formatted file containts the input and output file paths.
[
  {
    "outputFile": "wwwroot/css/style.css",
    "inputFile": "wwwroot/css/style.scss"
  }
]
If you want to add an additional Scss and CSS file, either right click the CSS file in the GUI like we just done, or alternatively you can edit the compiler.config file directly. For example:
[
  {
    "outputFile": "wwwroot/css/style.css",
    "inputFile": "wwwroot/css/style.scss"
  },{
    "outputFile": "wwwroot/css/menu.css",
    "inputFile": "wwwroot/css/menu.scss"
  }
]
All input files will be watched for changes, and the corrisponding output files will be updated when you make a change to the Scss, providing you have the extension installed. So remember to install the Web Compiler extension again if you work on the project from a new computer, since extensions don't currently follow the project between installations of Visual Studio.