Use a Jump Server for a Secure Tunnel to Lightsail Databases
Jump servers, otherwise known as bastion hosts, provide seperation between your servers and the internet.
The idea is that you make a secure connection to the jump server, which then forwards your request to the target server.

Note: In this blog post I'm going to talk about connecting to server's in AWS Lightsail as an example, however the same idea is applicable and transferable to Azure, Google Cloud or wherever you host your servers.
Why use a Jump Server?
Imagine that i've got 2 servers. A web server running on a compute instance, and then a seperate database instance in Lightsail.
I don't want to make my database publically accessable to the whole world over the internet because it leaves the system open to security breaches. However I need to sometimes make a connection to the database for development purposes.
Maybe I could only enable Public Mode while developing, but then I still need to remember to switch off Public Mode when I'm finished. And I might be spending days developing, which is a long time to leave the database accessable over the internet.
If I create a jump server in the same VPC as my database, then I can maintain a good level of security for my database, while forwarding requests from my development machine to the database. The web server can also connect to the database because it's on the same VPC.
Jump Server Security
By using a jump server, we're still exposing a server to the internet, which is our Linux jump server. However we'll be authenticating the connection to our Linux server with an SSH key, and you could go one step further with 2FA (two factor authentication). We need to have port 22 open for the SSH connection.
This is more secure than opening port 3306 for MySql, port 1433 for SQL Server or port 5432 for PostgreSQL to the whole world.
What is Local Port Forwarding?
As the guide below will show you. Local port forwarding allows traffic from a specific port on your computer, to be routed via the jump server, to the destination.
Instead of going from your computer to the database. The traffic goes from your computer > jump server > database.
Guide To Setting Up A Jump Server
Prerequisites
- You need to have MobaXterm installed. There are alternative programs, and you can also achieve the same results via the command line. But this tutorial will utilize MobaXterm.
- I'm assuming that you have a database or some kind of endpoint that you need to route traffic to inside Lightsail.
Setup Ubuntu Jump Server
Login to Lightsail, select the option for instances and then create a new instance.

Select the following options:
- Instance Location: Select the Region and availability zone where your target servers are located
- Blueprint: OS Only > Ubuntu (I'm using 18.04)
- SSH Key Pair: Select an existing or create and download a new SSH key
- Instance Plan: I'm using a $3.50 instance with 512mb RAM / 1vCPU / 20gb SSH / 1TB transfer. This should be more than enough for a jump server unless there's several people connecting at once.
- Instance name: Something useful
Make sure you have the SSH key downloaded from the Lightsail portal. You'll need this later.
When you're ready, click on Create Instance and wait for your machine to become ready.
Update The Server
It's a good idea to test your connection to the server. I recommend connecting to the server via SSH and updating via APT.
sudo apt update
Then,
sudo apt upgrade
Port Forwarding with MobaXterm
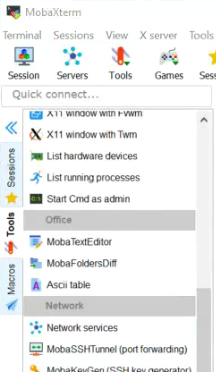
Open MobaXterm and open up the tools sidebar by clicking on the icon on the left hand side.
- Then click on MobaSSHTunnel (Port Forwarding).
- In the popup window, click on New SSH Tunnel.

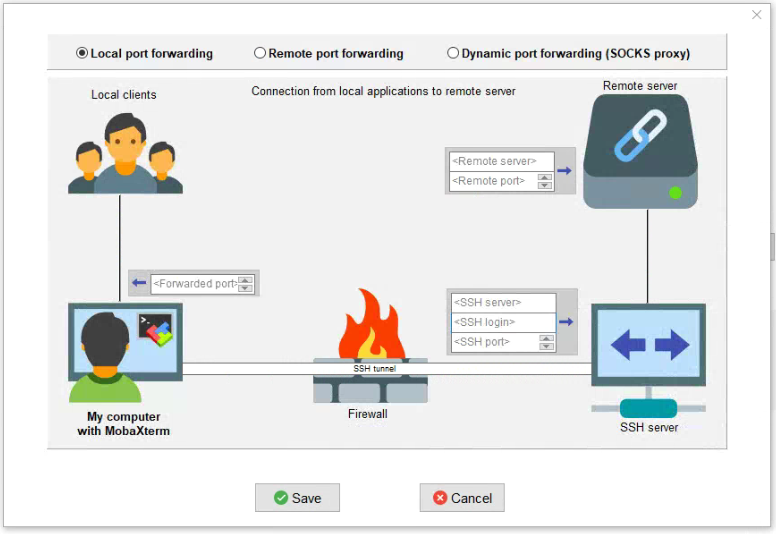
You should now see this window popup window, here we can specify the details of your port forwarding chain.

Keep the Local Port Forwarding radio button selected. And enter the below details based on your unique setup;
- Fordwarded Port: The local port that you wish to forward
- SSH Server: The IP address or name (if using DNS) of the server of the jump server.
- SSH Login: The username that you'll use to login to the server. On AWS Lightsail this is usually "ubuntu" by default.
- SSH Port: Usually port 22.
- Remote Server: The endpoint IP address or name of our database or server
- Remote Port: This will usually be the same as the forwarded port. Something like 3306 for MYSQL or something different depending on what you're connecting to.
Once you have this information entered, click on the save button.
SSH Key
You should now see the newly created port forwarding config on the SSH Tunnel list.

There's now one final task. Click on the key icon and browse to the location where you saved the SSH key you downloaded earlier.
Once you've opened the SSH key saved earlier, click on the start button to start your SSH tunnel.
Final Words
And that's it you should now be able to make a connection to the endpoint via your jump server.